It is glorious!…if I may use an expression from Ann of Green Gables. This article is all about exploring the world of half square triangles: what they are and how they are made. The following construction options will be explained so you can make a decision on what option would be the best for the project you are making.
- Traditional Half Square Triangle
- Simple 2-at-a-time Half Square Triangles
- 4-at-a-time Half Square Triangles
- Ultimate 8-at-a-time Half Square Triangles
- Stripping Half Square Triangles
- Other Mentions
What are Half Square Triangles?
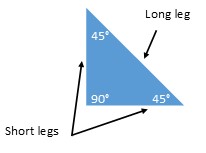
Half Square Triangles (HST) are discovered very early by beginner quilters. And seasoned quilters consider it a staple block. They have included it in their quilts a bajillion times over the years. The HST is simply the result of cutting a square in half diagonally. One square yields 2 HSTs. The anatomy of the HST; one angle is a square angle (90 degrees) and the other 2 angles are 45 degrees. The two shorter sides (legs) are equal in length and the third leg is longer.
HSTs of contrasting fabrics are often, but not always, sewn together on the long leg to form a square again. This new square is called an HST unit or block. Often in the quilting world you will hear the term HST used in reference to the triangle or the newly formed unit synonymously. No they are not the same. Its just an error in speaking or writing and is confusing for newbies. In this article HST is in reference to the triangle and HST unit is in reference to the newly formed block using 2 HSTs.
- HST – Half Square Triangle
- HST Unit – Half Square Triangle block (2 HSTs sewn together to form a square)

TIP: Are you a perfectionist? Quilting can be frustrating when points aren’t exact. Don’t be hard on yourself if you are just beginning. Over time this skill becomes second nature after experiencing several trials and errors.
Here’s the tip…I like to cut my starting squares a little larger (.25″ – .5″) than the formula dictates. This gives me an opportunity to square-up the HST units once they are sewn. Piecing with these units helps my quilt project go together smoother, with seams and points matching perfectly. Squaring-up is making sure all corners of the newly formed square are 90° angles and all sides are the same length.
Tools for squaring-up blocks: Bloc Loc HST rulers are my go to rulers to square up my HST units. They are grooved to snug the seam making it a breeze to trim the blocks to perfection.
Quilt Block Library: How to Make Half Square Triangle Units
Option 1: Traditional
Cut Pieces: 2 triangles
Yield: 2 HST / 1 HST Unit
Math Formula: Y = X + 7/8, with Y being the starting short legs length and X being our desired HST unit. (i.e. if you want a 4” HST unit… Y = 4 + 7/8 which becomes Y = 4 7/8)

When to use this technique: This is the traditional way to cut HSTs which your great grandmother or perhaps your grandmother did it. An HST template is used to cut each triangle individually. These templates were often made from cereal boxes and still are. If you don’t have very many triangles to cut this would be a good option. When working with scrap fabric, this may be your only option if your scraps are not big enough to use option 2.
Directions: Cut out template given in pattern or self created using formula. For easier tracing onto the fabric copy template over to a cereal box and cut it out. Place the template on each of two fabrics and trace around it. Using scissors, cut the 2 triangles from the fabrics . Place them right sides together and sew 1/4″ seam on the longest leg. Open and press. See diagram below. Trim if needed.

Option 2: Simple 2-at-a-time
Cut Pieces: 2 squares
Yield: 4 HST / 2 HST units
Math Formula: Y = X + 1, with Y being the starting square and X being your desired HST unit. (i.e. if you want a 4” HST unit… Y = 4 + 1 which becomes Y = 5)
When to use this technique: If you don’t have very many triangles to cut this would be a good option. When working with scrap fabric, this may be an option if your scraps are big enough.
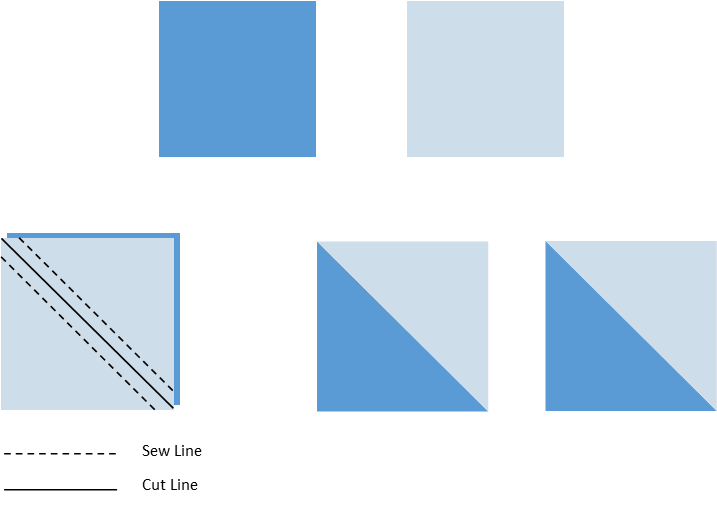
Directions: Cut 2 squares. Place them right sides together. Draw a line diagonally across top square. Stitch ¼” on both sides of the line then cut down the cut line and now you have 2 HST units. Open and press. See diagram below. Trim if needed.
Option 3: Advanced 4-at-a-time
Cut Pieces: 2 squares
Yield: 8 HST / 4 HST units
Math Formula: Y = (X*2) + 0.5, with Y being the starting square and X being your desired HST unit. (i.e. if you want a 4” HST unit… Y = (4*2) + 0.5 becomes Y = 8 + 0.5 which then becomes Y= 8.5)
When to use this technique: This technique yields HST units quickly. However, it has a drawback. All its edges are bias edges which easily stretch and have the potential to cause your quilt top to become wonky. To help prevent this, spray starch your pieces before sewing and use a walking foot or dual feed option on your machine.
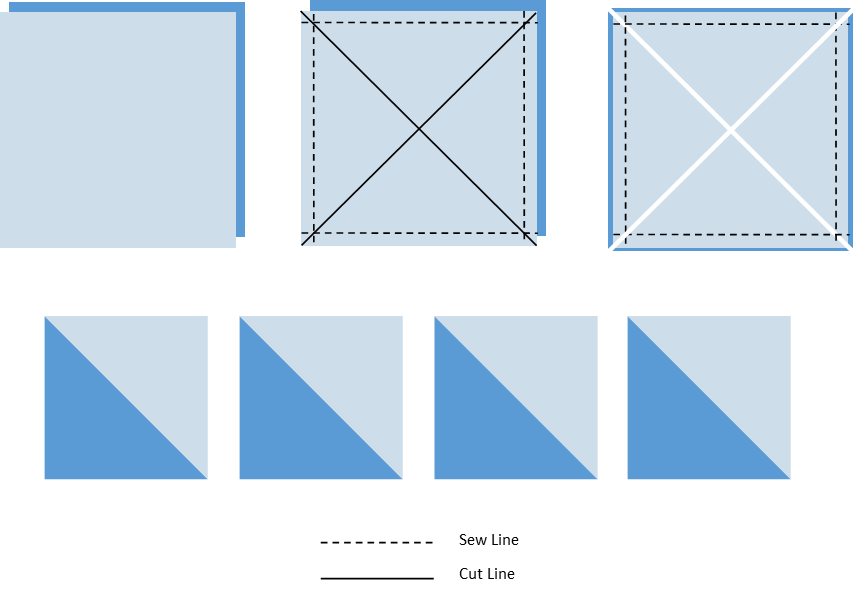
Directions: Spray starch fabric. Cut 2 squares. Place them right sides together. Draw 2 lines diagonally across top square. See diagram below. Stitch ¼” on all 4 edges of squares then cut down both diagonal lines and now you have 4 HST units. Open and press. See diagram below. Trim if needed.
Option 4: Ultimate 8-at-a-time HST Units
Cut Pieces: 2 squares
Yield: 16 HST / 8 HST units
Math Formula: Y= (X + 7/8)*2, with Y being the starting square and X being your desired HST unit. (i.e. if you want a 4” HST unit… Y = (4 + 7/8)*2 becomes Y = 4.875*2 which then becomes Y= 9.75)
When to use this technique: This is the big daddy of them all. If you are needing a large number of HST units, this is your best option. Unfortunately if you want to use scrap fabric this is probably not going to work unless you have large scraps.
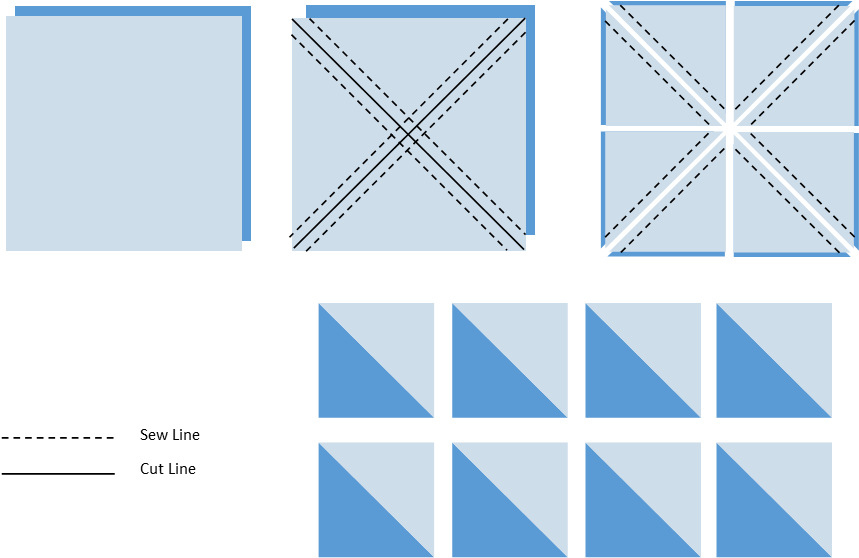
Directions: Cut 2 squares. Place them right sides together. Draw diagonal lines across top square as shown in diagram below. Stitch ¼” on both sides of each line. For cutting – refer to diagram below. First cut the vertical and horizontal cuts. These cuts are at the midpoint on each side. For accuracy, take the length of the square’s edge divided by 2 (using our example above 9.75/2=4.875 so the midpoint would be 4 7/8”) Next, cut down the diagonal lines and now you have 8 HST units. Open and press. See diagram below.
Option 5: Stripping
Cut Pieces: 2 strips
Yield: Multiple HST (based on size)
Math Formula: Honestly – I know there is a formula one could write for this. In my research I could not find an “easy” formula. I will put it on my list to make a guide in the future 🙂
When to use this technique: This method most often uses jelly roll strips (2 1/2″ wide x 44″), but don’t limit yourself to just a jelly roll. You can cut your needed fabric widths to suit your needed size.
Directions: Cut 2 strips of desired width across width of fabric (salvage to salvage – 44″) or use Jelly roll strips. With right sides together sew strips together along both long edges (44″).


Cutting the triangles: in order to speed up the process, I fold the strip in half and cut two at a time. On your cutting mat, find the 45° angle line. This is the angle all the cuts will be made. For the first cut, place the long edge of the strip on the horizontal line just past the 45° line. Place ruler on 45° line, cut. Discard the piece cut off.


Flip the strip. Still working on the horizontal lines, place the seam allowance below the horizontal line and place it tight to the point where the 45° angle line intersects the horizontal line making sure the strips are inline with the horizontal lines. Place ruler on the 45° line and cut. 2 HST units made. Flip and repeat to end of strip.


Finger press or iron press open HST units. Square-up units. At this stage, the HST unit is approximately 2 3/4″. Unfortunately these are not consistently square units nor do I use 2 3/4″ squares often. Therefore, to create my perfect HST unit I use Bloc Loc rulers. Because of their seam lock groove, they never fail. For this size of strip (jellyroll/2 1/2″) I use a 2.5″ or larger Bloc Loc ruler for trimming and end up with a 2 1/2″ block. Once I learned to square-up my blocks, my piecing became more consistent with matching seams and points did not disappear.


Place Bloc Loc ruler on square with folded seam snug in the groove. Leave bits around the ruler. Cut excess off. Watch this video for more details.


Voilà! A perfect 2 1/2″ HST unit ready for piecing.

Option 6: Other Mentions
Paper Guides – Paper guides eliminate the drawing of lines on your fabric but its the same technique. Simply place a paper guide on your prepared fabric, stitch, cut, press and trim.
Specialty fabric cutting and die cutting machines such as Silhouette, Cricut and AccuQuilt – if you are looking to save time and desire accuracy take a look at these options. Each have there own advantages and costs.
Last Thought
Grainline consideration: to avoid overstretching and your block or quilt top from becoming wonky, purposefully keep grainline in mind when selecting your HST technique. Consider how your triangles are going to be placed in the block. For example, if the long leg of the triangle will be running along the edge of the quilt, you don’t want it to be a bias edge. If the quilt will be longarm machine quilted, a bias quilt edge can be a nightmare. Hint – option 3 (4-at-a-time HST) would NOT be the best technique in this situation.
Happy Quilting!
Sonya
Entrepreneurship flows in Sonya’s blood. Some businesses include an artistic rubber stamp manufacturing business, opening and running a bed & breakfast, having a fabric and yarn shop, and currently growing her professional longarm quilting business. As a serial entrepreneur, she loves to mentor and coach small businesses. She misses farm life, loves to travel, and enjoys her husband, children, their spouses, and of course the grandkids.