Adding a border to your quilt is simple – or is it? The concept is simple but I learned early in my quilting journey that I could not just wing it. I thought all I needed to do was to cut strips a few inches longer than the side of my quilt, sew them on, and cut off the excess. Wow, did I end up with some crazy challenges when sandwiching my quilt tops and quilting them.
The ultimate goal is to have a squared quilt: a quilt top that has been pieced together, lies flat, and has four 90° corners.
How to ensure a squared quilt while adding borders and avoid a “growing problem” or what I call a “wonky” quilt.
- Precisely cut and sew pieces to form a quilt top (before borders are added).
- Keep in mind when cutting border strips – if there is any stretch at all to your border fabric, cut it lengthwise on the grain.
- Vertical borders: Measure the quilt top – from top to bottom on the left side, middle, and right side. Average these three measurements to determine the side border lengths, view diagram below*
- Top and bottom borders: Once side borders are added to the quilt top, measure side to side at the top, middle, and bottom. Average these three measurements to determine the top and bottom border lengths, view diagram below*
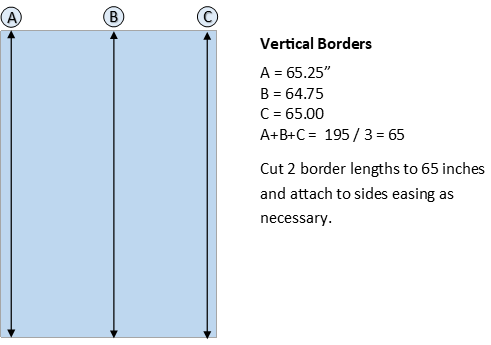
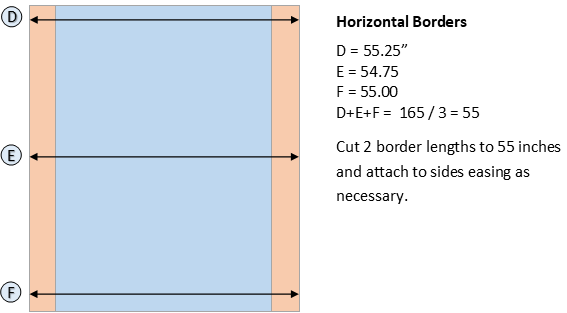
*if there is a difference of more than 1/2″, take the middle measurement and ease the border. It’s helpful to put the larger piece next to the machine bed.
Best Wishes!
Entrepreneurship flows in Sonya’s blood. Some businesses include an artistic rubber stamp manufacturing business, opening and running a bed & breakfast, having a fabric and yarn shop, and currently growing her professional longarm quilting business. As a serial entrepreneur, she loves to mentor and coach small businesses. She misses farm life, loves to travel, and enjoys her husband, children, their spouses, and of course the grandkids.